2023/04/14
Integrating React Flow and the Web Audio API

Today we’ll be looking at how to create an interactive audio playground using React Flow and the Web Audio API. We’ll start from scratch, first learning about the Web Audio API before looking at how to handle many common scenarios in React Flow: state management, implementing custom nodes, and adding interactivity.
A while back I shared a project I was working on to the React Flow discord server . It’s called bleep.cafe and it’s a little web app for learning digital synthesis all inside the browser. A lot of folks were interested to see how something like that was put together: most people don’t even know their browser has a whole synth engine built in!
This tutorial will take us step-by-step to build something similar. We may skip over some bits here and there, but for the most part if you’re new to React Flow or the Web Audio API you should be able to follow along and have something working by the end.
If you’re already a React Flow wizard you might want to read the first section covering the Web Audio API and then jump to the third to see how things are tied together!
But first…
A demo!
This and other examples in this tutorial make sound. To avoid creating an avant-garde masterpiece, remember to mute each example before moving on!
The Web Audio API
Before we get stuck in to React Flow and interactive node editor goodness, we need to take a crash course on the Web Audio API . Here are the highlights you need to know:
- The Web Audio API provides a variety of different audio nodes, including sources (e.g. OscillatorNode , MediaElementAudioSourceNode ), effects (e.g. GainNode , DelayNode , ConvolverNode ), and outputs (e.g. AudioDestinationNode ).
- Audio nodes can be connected together to form a (potentially cyclic) graph. We tend to call this the audio-processing graph, signal graph, or signal chain.
- Audio processing is handled in a separate thread by native code. This means we can keep generating sounds even when the main UI thread is busy or blocked.
- An AudioContext acts as the brain of an audio-processing graph. We can use it to create new audio nodes and suspend or resume audio processing entirely.
Hello, sound!
Let’s see some of this stuff in action and build our first Web Audio app! We won’t
be doing anything too wild: we’ll make a simple mouse
theremin . We’ll
use React for these examples and everything else moving forward (we’re called React
Flow after all!) and vite to handle bundling and hot
reloading.
If you prefer another bundler like parcel or Create React App that’s cool too, they all do largely the same thing. You could also choose to use TypeScript instead of JavaScript. To keep things simple we won’t use it today, but React Flow is fully typed (and written entirely in TypeScript) so it’s a breeze to use!
npm create vite@latest -- --template reactVite will scaffold out a simple React application for us, but can delete the assets
and jump right into App.jsx. Remove the demo component generated for us and start
by creating a new AudioContext and putting together the nodes we need. We want
an OscillatorNode to generate some tones and a GainNode to control the volume.
// Create the brain of our audio-processing graph
const context = new AudioContext();

// Create an oscillator node to generate tones
const osc = context.createOscillator();

// Create a gain node to control the volume
const amp = context.createGain();

// Pass the oscillator's output through the gain node and to our speakers
osc.connect(amp);
amp.connect(context.destination);

// Start generating those tones!
osc.start();
Oscillator nodes need to be started.
Don’t forget that call to osc.start. The oscillator won’t start generating
tones without it!
For our app, we’ll track the mouse’s position on the screen and use that to set the pitch of the oscillator node and the volume of the gain node.
import React from 'react';

const context = new AudioContext();
const osc = context.createOscillator();
const amp = context.createGain();

osc.connect(amp);
amp.connect(context.destination);

osc.start();

const updateValues = (e) => {
  const freq = (e.clientX / window.innerWidth) * 1000;
  const gain = e.clientY / window.innerHeight;

  osc.frequency.value = freq;
  amp.gain.value = gain;
};

export default function App() {
  return <div style={{ width: '100vw', height: '100vh' }} onMouseMove={updateValues} />;
}osc.frequency.value, amp.gain.value…
The Web Audio API makes a distinction between simple object properties and audio
node parameters. That distinction appears in the form of an AudioParam. You
can read up on them in the MDN docs
but for now it’s enough to know that you need to use .value to set the value
of an AudioParam rather than just assigning a value to the property directly.
If you try this example as it is, you’ll probably find that nothing happens. An
AudioContext often starts in a suspended state in an attempt to avoid ads hijacking
our speakers. We can fix that easily by adding a click handler on the <div />
to resume the context if it’s suspended.
const toggleAudio = () => {
  if (context.state === 'suspended') {
    context.resume();
  } else {
    context.suspend();
  }
};

export default function App() {
  return (
    <div ...
      onClick={toggleAudio}
    />
  );
};
And that’s everything we need to start making some sounds with the Web Audio API! Here’s what we put together, in case you weren’t following along at home:
Now let’s put this knowledge to one side and take a look at how to build a React Flow project from scratch.
Already a React Flow pro? If you’re already familiar with React Flow, you can comfortably skip over the next section and head straight on over to making some sounds. For everyone else, let’s take a look at how to build a React Flow project from scratch.
Scaffolding a React Flow project
Later on we’ll take what we’ve learned about the Web Audio API, oscillators, and gain nodes and use React Flow to interactively build audio-processing graphs. For now though, we need to put together an empty React Flow app.
We already have a React app set up with Vite, so we’ll keep using that. If you
skipped over the last section, we ran npm create vite@latest -- --template react
to get started. You can use whatever bundler and/or dev server you like, though.
Nothing here is vite specific.
We only need three additional dependencies for this project: @xyflow/react for our
UI (obviously!), zustand as our simple state management library (that’s what we use
under the hood at React Flow) and nanoid as a lightweight id generator.
npm install @xyflow/react zustand nanoidWe’re going to remove everything from our Web Audio crash course and start from
scratch. Start by modifying main.jsx to match the following:
import App from './App';
import React from 'react';
import ReactDOM from 'react-dom/client';
import { ReactFlowProvider } from '@xyflow/react';

// 👇 Don't forget to import the styles!
import '@xyflow/react/dist/style.css';
import './index.css';

const root = document.querySelector('#root');

ReactDOM.createRoot(root).render(
  <React.StrictMode>
    {/* React flow needs to be inside an element with a known height and width to work */}
    <div style={{ width: '100vw', height: '100vh' }}>
      <ReactFlowProvider>
        <App />
      </ReactFlowProvider>
    </div>
  </React.StrictMode>,
);
There are three important things to pay attention to here:
- You need to remember to import the React Flow CSS styles to make sure everything works correctly.
- The React Flow renderer needs to be inside an element with a known height and width,
so we’ve set the containing
<div />to take up the entire screen. - To use some of the hooks React Flow provides, your components need to be inside a
<ReactFlowProvider />or inside the<ReactFlow />component itself, so we’ve wrapped the entire app in the provider to be sure.
Next, hop into App.jsx and create an empty flow:
import React from 'react';
import { ReactFlow, Background } from '@xyflow/react';

export default function App() {
  return (
    <ReactFlow>
      <Background />
    </ReactFlow>
  );
}
We’ll expand and add on to this component over time. For now, we’ve added one of
React Flow’s built-in components - <Background /> -
to check if everything is setup correctly. Go ahead and run npm run dev (or
whatever you need to do to spin up a dev server if you didn’t choose vite) and
check out your browser. You should see an empty flow:
Leave the dev server running. We can keep checking back on our progress as we add new bits and bobs.
1. State management with Zustand
A Zustand store will hold all the UI state for our application. In practical terms that means it’ll hold the nodes and edges of our React Flow graph, a few other pieces of state, and a handful of actions to update that state.
To get a basic interactive React Flow graph going we need three actions:
onNodesChangeto handle nodes being moved around or deleted.onEdgesChangeto handle edges being moved around or deleted.addEdgeto connect two nodes in the graph.
Go ahead and create a new file, store.js, and add the following:
import { applyNodeChanges, applyEdgeChanges } from '@xyflow/react';
import { nanoid } from 'nanoid';
import { createWithEqualityFn } from 'zustand/traditional';

export const useStore = createWithEqualityFn((set, get) => ({
  nodes: [],
  edges: [],

  onNodesChange(changes) {
    set({
      nodes: applyNodeChanges(changes, get().nodes),
    });
  },

  onEdgesChange(changes) {
    set({
      edges: applyEdgeChanges(changes, get().edges),
    });
  },

  addEdge(data) {
    const id = nanoid(6);
    const edge = { id, ...data };

    set({ edges: [edge, ...get().edges] });
  },
}));
Zustand is dead simple to use. We create a function that receives both a set and
a get function and returns an object with our initial state along with the actions
we can use to update that state. Updates happen immutably and we can use the set
function for that. The get function is how we read the current state. And…
that’s it for zustand.
The changes argument in both onNodesChange and onEdgesChange represents
events like a node or edge being moved or deleted. Fortunately, React Flow provides
some helper
functions to apply those changes
for us. We just need to update the store with the new array of nodes.
addEdge will be called whenever two nodes get connected. The data argument is
almost a valid edge, it’s just missing an id. Here we’re getting nanoid to
generate a 6 character random id and then adding the edge to our graph, nothing
exciting.
If we hop back over to our <App /> component we can hook React Flow up to our
actions and get something working.
import React from 'react';
import { ReactFlow, Background } from '@xyflow/react';
import { shallow } from 'zustand/shallow';

import { useStore } from './store';

const selector = (store) => ({
  nodes: store.nodes,
  edges: store.edges,
  onNodesChange: store.onNodesChange,
  onEdgesChange: store.onEdgesChange,
  addEdge: store.addEdge,
});

export default function App() {
  const store = useStore(selector, shallow);

  return (
    <ReactFlow
      nodes={store.nodes}
      edges={store.edges}
      onNodesChange={store.onNodesChange}
      onEdgesChange={store.onEdgesChange}
      onConnect={store.addEdge}
    >
      <Background />
    </ReactFlow>
  );
}
So what’s this selector thing all about? Zustand let’s us supply a selector
function to pluck out the exact bits of state we need from the store. Combined
with the shallow equality function, this means we typically don’t have re-renders
when state we don’t care about changes.
Right now, our store is small and we actually want everything from it to help render our React Flow graph, but as we expand on it this selector will make sure we’re not re-rendering everything all the time.
This is everything we need to have an interactive graph: we can move nodes around, connect them together, and remove them. To demonstrate, temporarily add some dummy nodes to your store:
const useStore = createWithEqualityFn((set, get) => ({
  nodes: [
    { id: 'a', data: { label: 'oscillator' }, position: { x: 0, y: 0 } },
    { id: 'b', data: { label: 'gain' }, position: { x: 50, y: 50 } },
    { id: 'c', data: { label: 'output' }, position: { x: -50, y: 100 } }
  ],
  ...
}));
2. Custom nodes
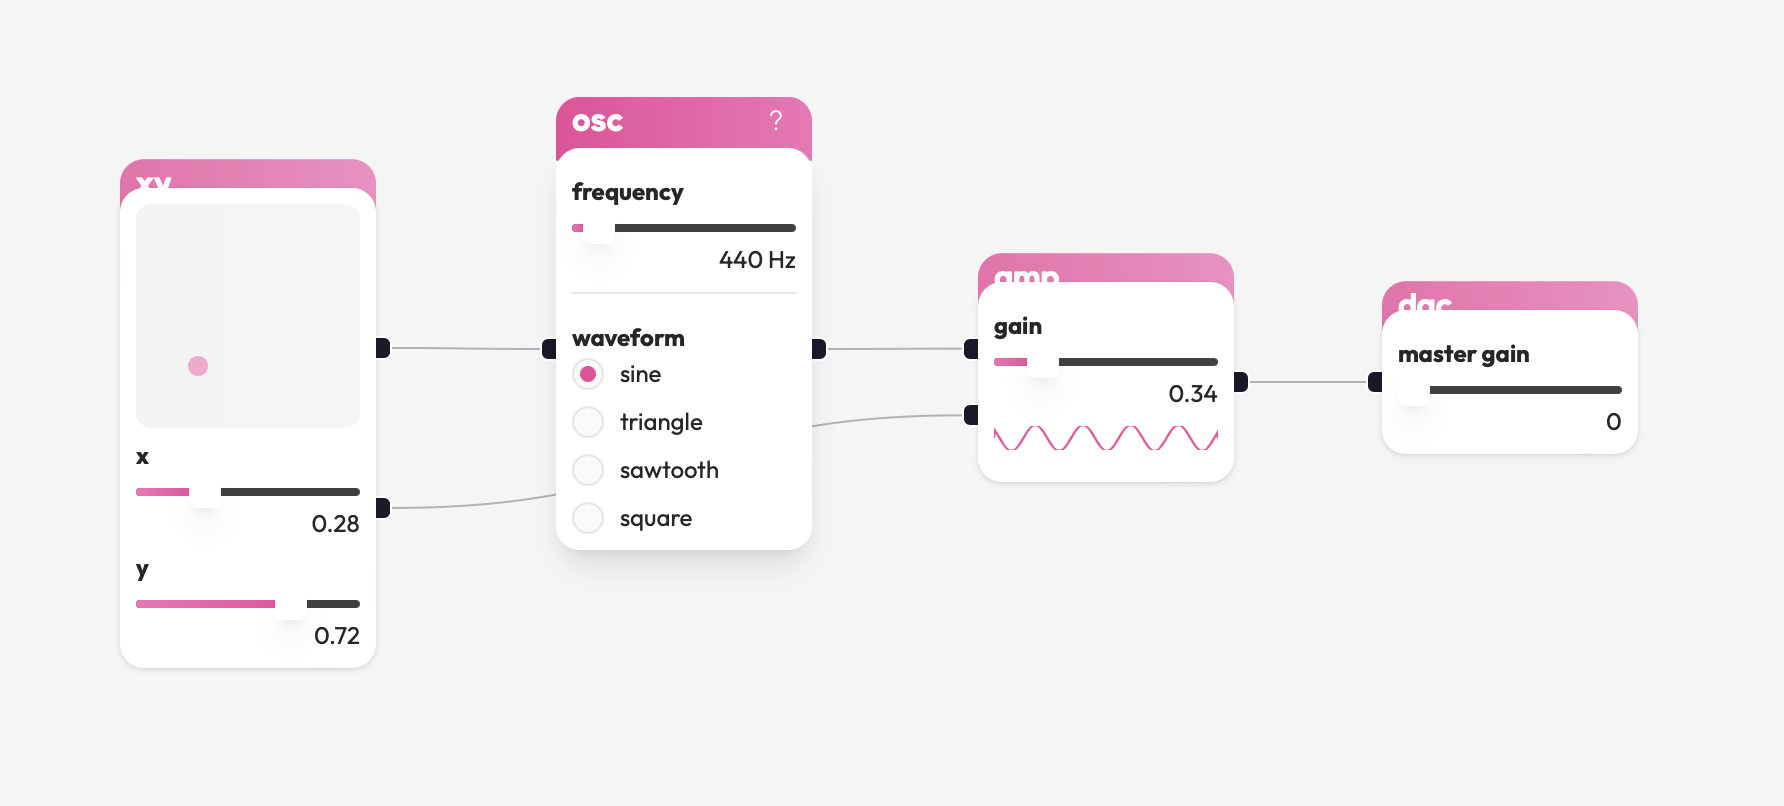
OK great, we have an interactive React Flow instance we can start playing with. We added some dummy nodes but they’re just the default unstyled ones right now. In this step we’ll add three custom nodes with interactive controls:
- An oscillator node and controls for the pitch and waveform type.
- A gain node and a control for the volume
- An output node and a button to toggle audio processing on and off.
Let’s create a new folder, nodes/, and create a file for each custom node we
want to create. Starting with the oscillator we need two controls and a source
handle to connect the output of the oscillator to other nodes.
import React from 'react';
import { Handle } from '@xyflow/react';

import { useStore } from '../store';

export default function Osc({ id, data }) {
  return (
    <div>
      <div>
        <p>Oscillator Node</p>

        <label>
          <span>Frequency</span>
          <input
            className="nodrag"
            type="range"
            min="10"
            max="1000"
            value={data.frequency} />
          <span>{data.frequency}Hz</span>
        </label>

        <label>
          <span>Waveform</span>
          <select className="nodrag" value={data.type}>
            <option value="sine">sine</option>
            <option value="triangle">triangle</option>
            <option value="sawtooth">sawtooth</option>
            <option value="square">square</option>
          </select>
      </div>

      <Handle type="source" position="bottom" />
    </div>
  );
};
“nodrag” is important.
Pay attention to the "nodrag" class being added to both the <input /> and
<select /> elements. It’s super important that you remember to add this class
otherwise you’ll find that React Flow intercepts the mouse events and you’ll be
stuck dragging the node around forever!
If we try rendering this custom node we’ll find that the inputs don’t do anything.
That’s because the input values are fixed by data.frequency and data.type but
we have no event handlers listening to changes and no mechanism to update a node’s
data!
To fix the situation we need to jump back to our store and add an updateNode action:
export const useStore = createWithEqualityFn((set, get) => ({
  ...

  updateNode(id, data) {
    set({
      nodes: get().nodes.map(node =>
        node.id === id
          ? { ...node, data: { ...node.data, ...data } }
          : node
      )
    });
  },

  ...
}));
This action will handle partial data updates, such that if we only want to update a
node’s frequency, for example, we could just call updateNode(id, { frequency: 220 }.
Now we just need to bring the action into our <Osc /> component and call it
whenever an input changes.
import React from 'react';
import { Handle } from '@xyflow/react';
import { shallow } from 'zustand/shallow';

import { useStore } from '../store';

const selector = (id) => (store) => ({
  setFrequency: (e) => store.updateNode(id, { frequency: +e.target.value }),
  setType: (e) => store.updateNode(id, { type: e.target.value }),
});

export default function Osc({ id, data }) {
  const { setFrequency, setType } = useStore(selector(id), shallow);

  return (
    <div>
      <div>
        <p>Oscillator Node</p>

        <label>
          <span>Frequency:</span>
          <input
            className="nodrag"
            type="range"
            min="10"
            max="1000"
            value={data.frequency}
            onChange={setFrequency}
          />
          <span>{data.frequency}Hz</span>
        </label>

        <label>
          <span>Waveform:</span>
          <select className="nodrag" value={data.type} onChange={setType}>
            <option value="sine">sine</option>
            <option value="triangle">triangle</option>
            <option value="sawtooth">sawtooth</option>
            <option value="square">square</option>
          </select>
        </label>
      </div>

      <Handle type="source" position="bottom" />
    </div>
  );
}
Hey, that selector is back! Notice how this time we’re using it to derive
two event handlers, setFrequency and setType, from the general updateNode
action.
The last piece of the puzzle is to tell React Flow how to render our custom node.
For that we need to create a nodeTypes object: the keys should correspond to a
node’s type and the value will be the React component to render.
import React from 'react';
import { ReactFlow } from '@xyflow/react';
import { shallow } from 'zustand/shallow';

import { useStore } from './store';
import Osc from './nodes/Osc';

const selector = (store) => ({
  nodes: store.nodes,
  edges: store.edges,
  onNodesChange: store.onNodesChange,
  onEdgesChange: store.onEdgesChange,
  addEdge: store.addEdge,
});

const nodeTypes = {
  osc: Osc,
};

export default function App() {
  const store = useStore(selector, shallow);

  return (
    <ReactFlow
      nodes={store.nodes}
      nodeTypes={nodeTypes}
      edges={store.edges}
      onNodesChange={store.onNodesChange}
      onEdgesChange={store.onEdgesChange}
      onConnect={store.addEdge}
    >
      <Background />
    </ReactFlow>
  );
}
Avoid unnecessary renders.
It’s important to define nodeTypes outside of the <App /> component (or use
React’s useMemo) to avoid recomputing
it every render.
If you’ve got the dev server running, don’t panic if things haven’t changed yet!
None of our temporary nodes have been given the right type yet, so React Flow
just falls back to rendering the default node. If we change one of those nodes to
be an osc with some initial values for frequency and type we should see
our custom node being rendered.
const useStore = createWithEqualityFn((set, get) => ({
  nodes: [
    { type: 'osc',
      id: 'a',
      data: { frequency: 220, type: 'square' },
      position: { x: 0, y: 0 }
    },
    ...
  ],
  ...
}));
Stuck on styling?
If you’re just implementing the code from this post as you go along, you’ll see that your custom node doesn’t look like the one in the preview above. To keep things easy to digest, we’ve left out styling in the code snippets.
To learn how to style your custom nodes, check out our docs on theming or our example using Tailwind.
Implementing a gain node is pretty much the same process, so we’ll leave that one to you. Instead, we’ll turn our attention to the output node. This node will have no parameters control, but we do want to toggle signal processing on and off. That’s a bit difficult right now when we haven’t implemented any audio code yet, so in the meantime we’ll add just a flag to our store and an action to toggle it.
const useStore = createWithEqualityFn((set, get) => ({
  ...

  isRunning: false,

  toggleAudio() {
    set({ isRunning: !get().isRunning });
  },

  ...
}));
The custom node itself is then pretty simple:
import React from 'react';
import { Handle } from '@xyflow/react';
import { shallow } from 'zustand/shallow';
import { useStore } from '../store';

const selector = (store) => ({
  isRunning: store.isRunning,
  toggleAudio: store.toggleAudio,
});

export default function Out({ id, data }) {
  const { isRunning, toggleAudio } = useStore(selector, shallow);

  return (
    <div>
      <Handle type="target" position="top" />

      <div>
        <p>Output Node</p>

        <button onClick={toggleAudio}>
          {isRunning ? (
            <span role="img" aria-label="mute">
              🔇
            </span>
          ) : (
            <span role="img" aria-label="unmute">
              🔈
            </span>
          )}
        </button>
      </div>
    </div>
  );
}
Things are starting to shape up quite nicely!
The next step, then, is to…
Do sound to it
We have an interactive graph and we’re able to update node data, now let’s add
in what we know about the Web Audio API. Start by creating a new file, audio.js,
and create a new audio context and an empty Map.
const context = new AudioContext();
const nodes = new Map();
The way we’ll manage our audio graph is by hooking into the different actions in
our store. So we might connect two audio nodes when the addEdge action is called,
or update an audio node’s properties when updateNode is called, and so on.
Hardcoded nodes
We hardcoded a couple of nodes in our store earlier on in this post but our audio graph doesn’t know anything about them! For the finished project we can do away with all these hardcoded bits, but for now it’s really important that we also hardcode some audio nodes.
Here’s how we did it:
const context = new AudioContext();
const nodes = new Map();

const osc = context.createOscillator();
osc.frequency.value = 220;
osc.type = 'square';
osc.start();

const amp = context.createGain();
amp.gain.value = 0.5;

const out = context.destination;

nodes.set('a', osc);
nodes.set('b', amp);
nodes.set('c', out);
1. Node changes
Right now, there are two types of node changes that can happen in our graph and
that we need to respond to: updating a node’s data, and removing a node from the
graph. We already have an action for the former, so let’s handle that first.
In audio.js we’ll define a function, updateAudioNode, that we’ll call with a
node’s id and a partial data object and use it to update an existing node in
the Map:
export function updateAudioNode(id, data) {
  const node = nodes.get(id);

  for (const [key, val] of Object.entries(data)) {
    if (node[key] instanceof AudioParam) {
      node[key].value = val;
    } else {
      node[key] = val;
    }
  }
}
Remember that properties on an audio node may be special AudioParams that must be
updated differently to regular object properties.
Now we’ll want to update our updateNode action in the store to call this function
as part of the update:
import { updateAudioNode } from './audio';

export const useStore = createWithEqualityFn((set, get) => ({
  ...

  updateNode(id, data) {
    updateAudioNode(id, data);
    set({ nodes: ... });
  },

  ...
}));
The next change we need to handle is removing a node from the graph. If you select
a node in the graph and hit backspace, React Flow will remove it. This is implicitly
handled for us by the onNodesChange action we hooked up, but now we want some
additional handling we’ll need to wire up a new action to React Flow’s onNodesDelete
event.
This is actually pretty simple, so I’ll save you some reading and present the next three snippets of code without comment.
./src/audio.js
export function removeAudioNode(id) {
  const node = nodes.get(id);

  node.disconnect();
  node.stop?.();

  nodes.delete(id);
}The only thing to note is that onNodesDelete calls the provided callback with
an array of deleted nodes, because it is possible to delete more than one node
at once!
2. Edge changes
We’re getting super close to actually making some sounds! All that’s left is to
handle changes to our graph’s edges. Like with node changes, we already have an
action to handle creating new edges and we’re also implicitly handling removed
edges in onEdgesChange.
To handle new connections, we just need the source and target ids from the
edge created in our addEdge action. Then we can just look up the two nodes in
our Map and connect them up.
./src/audio.js
export function connect(sourceId, targetId) {
  const source = nodes.get(sourceId);
  const target = nodes.get(targetId);

  source.connect(target);
}We saw React Flow accepted an onNodesDelete handler and wouldn’t you know it,
there’s an onEdgesDelete handler too! The approach we’d take to implement disconnect
and hook it up to our store and React Flow instance is pretty much the same as
before, so we’ll leave that one down to you as well!
3. Switching the speakers on
You’ll remember that our AudioContext probably begins in a suspended state to
prevent potentially annoying autoplay issues. We already faked the data and actions
we need for our <Out /> component in the store, now we just need to replace
them with the real context’s state and resume/suspend methods.
export function isRunning() {
  return context.state === 'running';
}

export function toggleAudio() {
  return isRunning() ? context.suspend() : context.resume();
}
Although we haven’t been returning anything from our audio functions up until now,
we need to return from toggleAudio because those methods are
asynchronous and we don’t want to update the store prematurely!
import { ..., isRunning, toggleAudio } from './audio'

export const useStore = createWithEqualityFn((set, get) => ({
  ...

  isRunning: isRunning(),

  toggleAudio() {
    toggleAudio().then(() => {
      set({ isRunning: isRunning() });
    });
  }
}));
Et voilà, we did it! We’ve now put enough together to actually make sounds! Let’s see what we have in action.
4. Creating new nodes
Up until now we have been dealing with a hard-coded set of nodes in our graph. This has been fine for prototyping but for it to actually be useful we’ll want a way to add new nodes to the graph dynamically. Our final task will be adding this functionality: we’ll work backwards starting with the audio code and ending by creating a basic toolbar.
Implementing a createAudioNode function will be simple enough. All we need is
an id for the new node, the type of node to create, and its initial data:
export function createAudioNode(id, type, data) {
  switch (type) {
    case 'osc': {
      const node = context.createOscillator();
      node.frequency.value = data.frequency;
      node.type = data.type;
      node.start();

      nodes.set(id, node);
      break;
    }

    case 'amp': {
      const node = context.createGain();
      node.gain.value = data.gain;

      nodes.set(id, node);
      break;
    }
  }
}
Next we’ll need a createNode function in our store. The node id will be generated
by nanoid and we’ll hardcode some initial data for each of the node types, so the
only thing we need to pass in is the type of node to create:
import { ..., createAudioNode } from './audio';

export const useStore = createWithEqualityFn((set, get) => ({
  ...

  createNode(type) {
    const id = nanoid();

    switch(type) {
      case 'osc': {
        const data = { frequency: 440, type: 'sine' };
        const position = { x: 0, y: 0 };

        createAudioNode(id, type, data);
        set({ nodes: [...get().nodes, { id, type, data, position }] });

        break;
      }

      case 'amp': {
        const data = { gain: 0.5 };
        const position = { x: 0, y: 0 };

        createAudioNode(id, type, data);
        set({ nodes: [...get().nodes, { id, type, data, position }] });

        break;
      }
    }
  }
}));
We could be a bit smarter about calculating the position of the new node, but
to keep things simple we’ll just hardcode it to { x: 0, y: 0 } for now.
The final piece of the puzzle is to create a toolbar component that can trigger
the new createNode action. To do that we’ll jump back to App.jsx and make use
of the <Panel />
built-in component.
...
import { ReactFlow,  Panel } from '@xyflow/react';
...

const selector = (store) => ({
  ...,
  createNode: store.createNode,
});

export default function App() {
  const store = useStore(selector, shallow);

  return (
    <ReactFlow>
      <Panel position="top-right">
        ...
      </Panel>
      <Background />
    </ReactFlow>
  );
};
We don’t need anything fancy here, just a couple of buttons that trigger the
createNode action with the appropriate type:
<Panel position="top-right">
  <button onClick={() => store.createNode('osc')}>osc</button>
  <button onClick={() => store.createNode('amp')}>amp</button>
</Panel>
And that’s… everything! We’ve now got a fully functional audio graph editor that can:
- Create new audio nodes
- Update node data with some UI controls
- Connect nodes together
- Delete nodes and connections
- Start and stop audio processing
Here’s the demo from the beginning, but this time you can see the source code to make sure you haven’t missed anything.
Final thoughts
Whew that was a long one, but we made it! For our efforts we’ve come out the other side with a fun little interactive audio playground, learned a little bit about the Web Audio API along the way, and have a better idea of one approach to “running” a React Flow graph.
If you’ve made it this far and are thinking “Hayleigh, I’m never going to write a Web Audio app. Did I learn anything useful?” Then you’re in luck, because you did! You could take our approach to connecting to the Web Audio API and apply it to some other graph-based computation engine like behave-graph . In fact, some has done just that and created behave-flow !
There are still plenty of ways to expand on this project. If you’d like to keep working on it, here are some ideas:
- Add more node types.
- Allow nodes to connect to
AudioParamson other nodes. - Use the
AnalyserNodeto visualize the output of a node or signal. - Anything else you can think of!
And if you’re looking for inspiration, there are quite a few projects out in the wild that are using node-based UIs for audio things. Some of my favorites are Max/MSP , Reaktor , and Pure Data . Max and Reaktor are closed-source commercial software, but you can still steal some ideas from them .
You can use the completed source code as a starting point, or you can just keep building on top of what we’ve made today. We’d love to see what you build so please share it with us over on our Discord server or Twitter .
React Flow is an independent company financed by its users. If you want to support us you can sponsor us on Github or subscribe to one of our Pro plans.